Submitting an assignment on Assign2
Published on: 2025-12-08 by Edufide
This guide walks you through the process of submitting your assignment using Assign2. Designed for flexibility, Assign2 allows you to easily upload handwritten work, digital files, or photos from your mobile device.
🌟 Key Things to Know
- Multiple Formats: You can upload PDF files, images (JPG/PNG), or take photos directly.
- Save vs. Submit: Uploading saves your work, but you must click Submit to finalize it.
- Auto-Submit: If the deadline passes, whatever you have uploaded will be automatically submitted.
- Edit Before Deadline: You can replace files as many times as needed before the due date.
Contents:
Accessing the Assignment
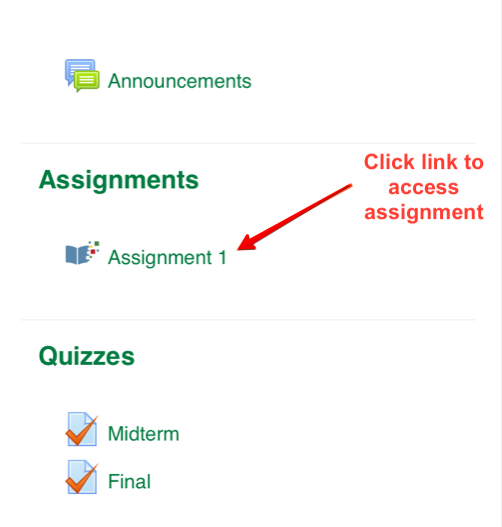
Most students access Assign2 directly through their course page.
Log in to your LMS (Canvas, Moodle, etc.) and navigate to your course.
Click the assignment link provided by your instructor. This will launch the Assign2 interface in a new tab or window.
You will see the Assignment Dashboard showing:
- Due Date: When you must submit by.
- Instructions: Any specific guidelines from your instructor.
- Question List: The specific questions you need to answer.
Uploading Your Work
You can upload answers for each question individually. This keeps your work organized and ensures graders see exactly the right page for each problem.
Option A: Uploading Files (Desktop/Laptop)
- Recommended for scanned PDFs or digital documents.
- Click Upload or drag-and-drop your file into the box for the specific question.
- Assign2 accepts PDF, JPG, and PNG files.
Option B: Taking Photos (Mobile)
- Recommended for handwritten work.
- Open the assignment link on your phone.
- Tap Upload > Take Photo (or select from your gallery).
- Take a clear picture of your answer page.
💡 Tip for Best Quality: Ensure you have good lighting and hold your camera steady. Dark or blurry photos are hard for instructors to grade!
Managing Uploaded Files
Once a file is uploaded, you have a few tools to ensure it looks right:
- Preview: Click the thumbnail to view the full-size image.
- Rotate: If your image is sideways, use the Rotate Left/Right buttons in the preview window to fix it.
- Remove: Click the X or trash icon to delete a file if you uploaded the wrong one.

Finalizing Your Submission
Uploading files saves them to the system, but you must explicitly submit your assignment to mark it as complete.
Review your uploads one last time. Ensure every question has an answer.
Click the Submit button at the bottom of the page.
A Confirmation Window will appear showcasing a preview of all your pages. scroll through to verify everything is readable.
Click Save (or Submit) in this modal to officially finalize your attempt.
Your status will update to Submitted. You should see a timestamp confirming when it was received.
⚠️ Important: If the due date passes and you haven’t clicked Submit, Assign2 will automatically submit whatever files you have currently uploaded to prevent you from getting a zero.
Troubleshooting
Upload Failed or Slow?
- Check your internet connection.
- Ensure your file size isn’t massive (try to keep images under 5MB if possible).
- Refresh the page and try again (don’t worry, previously uploaded files are safe).
Uploaded the Wrong File?
- As long as the deadline hasn’t passed, you can just delete the wrong file and upload the correct one.
- If you realized after the deadline, contact your instructor immediately.
Cannot Click “Submit”?
- Ensure you aren’t past the deadline (unless late submissions are allowed).
- If the button is grayed out, try refreshing the page.
Need Help?
If you encounter technical errors that persist, take a screenshot of the error message and contact your instructor or IT support with the time and details of the issue.